Peter McBride
home | antique and old tools
| links | email
TOOL MAKING PAGE
click on the images for a larger picture


No tails or pins, just finger joint cut into both the sides and base - the metal must be peened into a recess ( seen here ) but cut into both the base and sides to form the double dovetails. I tried this " finger joint " method on the plane because of the lessons learned when I made the little bull nose chariot where I didn't cut a tail on the base or sides and it worked very well.


25th January 2007

Came to a bit of a hurdle here...next step is the knob and lever
cap...do I cast of fabricate..?? I made some smaller block planes to
trial a few ideas. click
here and a miniature brass smoother with a steel sole lead
soldered on. click
here


27th August 2007
I wanted to make my own knobs, and wasn't thrilled with the diamond knurling tool I already had, so I made one myself. It's a piece of silver steel I cut up using the flex drive on my Jeweller's bench. They are very forgiving of misalignments and such, they will turn and turn until all the high spots have been pushed down. The one at the back came in a box of old tools, it makes a nice fine pattern.


I cut the lever from a solid block of brass with a hacksaw, drill and files. The planes behind are a Mathieson and an unmarked plane with a side profile I like. These help with some of the critical angles and dimensions.


10th September 2007
Here is the lever in the plane, with a dummy block of wood behind the temporary blade set. I made a narrower lever at the same time for a rebate plane, which will be the next plane I make...perhaps using a row of countersunk screws in place of dovetails to attach the sides..


15th October 2007
Made a start on the wood infill, using some Australian Blackwood. One coat of Danish oil just for initial sealing, more finish on it later. The next step is to stamp my mark into the lever.


I used a particularly handy, but simple device when
doing the woodwork...a second smaller vice fixed to a short plank of
wood held in the bench vice. This brought the work up to a good
height, and I could hold the wood all around the vice and at any angle I
needed.

20th October 2007
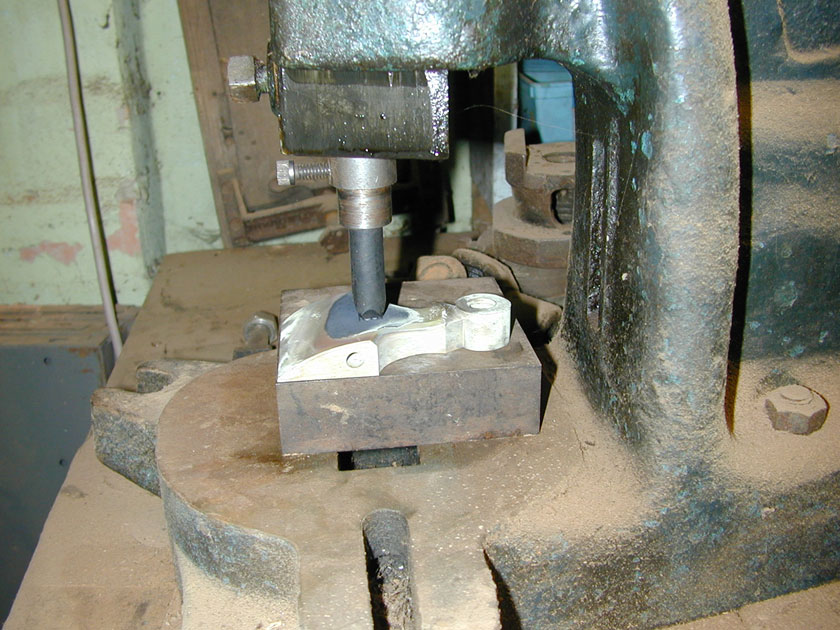
I made a tool holder for my maker's mark punch to stamp my logo onto the lever cap using the "Fly Press". I heat the brass to just under red hot and quickly align it under the punch. The black area is just oxidation on a recently filed area where I was refining the shape a little. It will clean up with a soak in acid solution, and then some emery and polishing


Almost 6 months have passed since I started, and now the plane is finished....


Copyright © Peter McBride 2007